Caitlin Ong Lynn Dee / 0343801 / Bachelor of Design (Hons) in Creative Media
Typography
Task 1/Exercise
CONTENTS
1. Lectures
- Typo_0_Eportfolio Briefing
- Typo_1_Development
- Typo_2_Basic
- Typo_3_Text_Part 1
- Typo_4_Text_Part 2
- Typo_5_Understanding
- Typo_6_ Screen and Print
3. Tutorials
4. Submission
- Task 1/Exercise 1: Type Expression
- Sketching
- Digitalization
- Draft 1
- New Sketches
- Experimentation
- Final Type Expression
- Animation
- Final Animation
- Task 1/Exercise 2: Text Formatting
- Name Kerning
- Planning
- Drafts
- Draft 1
- Draft 2
- Final Text Formatting
- Fixed Version
6. Reflection
7. Further Reading
8. References
LECTURE
TYPO_0_EPORTFOLIO BRIEFING
Mr. Vinod showed us how to our E-portfolio is supposed to be structured. The E-portfolio is spit into 5 chapters. Before we begin categorizing, we have to list our name and ID, task, and task timeline. The first chapter is where we write about our lectures. The second chapter is where the instruction of the assignment is located and a documentation of our assignment progress. The third chapter is where we record the general feedback and the specific feedback of our work. The fourth chapter is where we write our reflection, Mr. Vinod put a link on Facebook on how to do a proper reflection. The fifth one is where we write about a book or an online document about typography.
TYPO_1_DEVELOPMENT
The one of the earliest known written scripts is Phoenician by using primitive tools. They use sharpened stick to scratch on a wet clay or carve a stone with chisel. The uppercase forms (the only letterform during that period) consisted of a combination of straight lines and circles and from then on, the script eventually evolve from Phoenician to Early Greek to Early Latin to Modern Lain.
Early letterform development: Phoenician to Roman:


Hand Script from 3rd - 10th century C.E
-
Square Capitals - Found in Roman monuments, the letterforms
have serifs to finish the main strokes.

-
Rustic Capitals - A compressed version of square capital.
They are faster and easier to write but hard to read.

- Roman Cursive - Unlike Rustic Capitals & Square Capitals which is use for documents. Roman Cursive is use for everyday transaction; the cursive form is simplified for speed.|

-
Uncials - More readable at small size than rustic
capitals

- Half - uncials -. It marks the formal introduction of the first lowercase letterform., replete with ascenders and descenders,200 years after the origin of Phoenician alphabet.

-
Carolingian Minuscule - Charlemagne, the first unifier of
Europe since the Roman, issued an edict in 789 to
standardize all ecclesiastical text. He entrusted this task to
Alcuin of York, Abbot of St Martin of Tours. The monks rework the
text using both majuscules (uppercase), miniscule, capitalization
and punctuation which set the standard for calligraphy for a
century.

-
Blackletter (Textura) - With the dissolution of
Charlemagne's empire came regional variation upon Alcuin's script,
in northern Europe, a condense strongly vertical letterform know
as Blackletter or Textura gained popularity. In the south, a
rounder more open hand gained popularity, called 'rotunda'. The
humanistic script in Italy is based on Alcuin's miniscule.

- Gutenberg - Gutenberg's skills included engineering, metalsmithing, and chemistry. He marshaled them all to build pages that accurately mimicked the work of the scribe's hand - Blackletter of northern Europe. His type of mold required a different brass matrix, or negative impression, for each letterform.


TYPO_2_BASIC
Describing letter forms
- Type family – is a family with many different type faces (bold, ascended, regular, semi bold)
- Type face – individual weight of that stroke
- Full font – Type family
- Baseline – imaginary line the visual base of the letterforms.
- Median – imaginary line defining the X height of letterform.
- X-Height – The height of any typeface of lower-case X

- Stroke – Any line that defines the basic letterform.
- Apex and Vertex – the point created by joining two diagonal stems (apex above and vertex below)
- Arm – short strokes off the stem of the letterform.
- Ascender – portion of the stem of a lowercase that projects above the median.
- Barb - The half- serif finish on curved stroke
- Beak - the half- serif finish on some horizontal arms
- Bowl - The rounded that describes a counter. The bowl may be either open or closed.
- Bracket - The transition between the Serif and the stem.
- Crossbar - The horizontal stroke in a letterform that joins 2 stems together.
- Cross Stroke - The horizontal stroke in a letterform that joins 2 stems together.
- Crotch - the interior space where two stroke meets.
- Descender - the portion of the stem of a lowercase letter form that projects below the baseline.
- Ear - the stroke extending out from the main stem or body of the letterform.
- Em - the distance equal to the size of the typeface
- En - Half of an em
- Finial - The round non-series terminal to a stroke
- Ligature - The character formed by the combination of two or more letterforms.
- Link - The stroke that connects the bowl and the loop of a lowercase.
- Loop - some typeface, the bowl created in the descender of the lowercase G.
- Serif - the right-angled or oblique foot at the end of the stroke
- Shoulder - The curved stroke that is not part of a bowl.
-
Spine - The curved stem of the S

- Spur - The extension the articulates the junction of curved and rectilinear stroke.
- Stem - The significant vertical or oblique stroke
-
Stress - The orientation of the letterform, indicated by the thin
stroke in round forms.

- Swash - The flourish that extends the stroke of letterform.
- Terminal - The self-contained finish of a stroke without a Serif.
-
Uppercase - Capital letter

-
Lowercase - same characters as uppercase

-
Small Capitals - Uppercase letterform draw to the x-height of the typeface.

-
Uppercase Numerals - lining figures

-
Lowercase Numerals - old style figure or text figures

-
Italic - most fonts are produced with matching italic. (15th
century Italian cursive)

-
Punctuation - most contain punctuation marks, miscellaneous
character can change from typeface.

TYPO_3_TEXT_PART 1
Letterspacing
- Kerning - it refers the adjustment of space between letters, it is mostly used to adjust headline for newspapers or books.

- Tracking - tracking help to adjust the overall letter space of a word. when it comes to tracking, we have to be aware of the space within the letter, too much space can make to word unreadable.

Text type Format
- Flush Left - a format which the structure is asymmetrical and the words in a line start for the left at the the same point and the linewill end from the last word. It always has an ragged ragging on the right.
-
Ragging - the jagged edge of a end of point

-
Centered - a format with a symmetrical structure, it has a
ragging both left a right.

- Flush Right - a format which the end of line arranges evenly, it is useful for captions. The raging is on the left.

-
Justified - similar to centering, the formant also has a
symmetrical structure. It doesn't have a ragging, and it is achieved by
expanding or reducing spaces between words and, sometime, between
letters.

Goals for Readability
- Type size: Text type should be large enough to read easily.
- Leading: Space between the lines must be breathable. Too tight can cause the reader to lose track on where they are reading.
- Line Length: Different line length will play a part for the leading. Shorter lines need less leading while longer one needs more. The line length needs to be a maximum between 55-65 characters.
Compositional Requirement
The Text must occupy the whole page or screen. The ideal text should
have a middle grey value.
TYPO_4_TEXT_PART 2
Line space vs Leading

- Indentation - A space located at the starting point of a paragraph. It is used to eliminate paragraph spacing in order to save space on a paper. Mostly use on newspaper.

- Widow - a short line of text left isolated at the end of the column of text.
- Orphan - a short line of text left isolated at the start of the column of text.

How to highlight important information
- Italic
- Bold
- Change color: cyan, magenta.
- Change the font into a different family. An effective way is to change from serif to sans serif.
Reading Axis
- Quotation marks can be inside or outside the reading axis.
- Prime – it indicates feet (‘) and inches (“).

Typography Hierarchy
-
"A" Headline - it indicates a separation between the topic within the section.
Examples:

First one – clear headline on a different type of family along the reading axis
Second one – clear headline from a different type of family, outside but in the line of the body of text it is referring to.
Third one – same type family but larger
Forth one – small capitals
- "B" Headline - it serves as a subordinate to "A" Heading. The B heading states the supporting information or example of the topic.

- "C" Headline - they highlight important terms of the material within the B Headline statement. They are shown in small caps and don't disturb the reading flow.

- Cross Alignment - it is when heading, captions and body text are restricted to an architectural structure of a page. In order to cohesive vertical and horizontal flow of the text

TYPO_5_UNDERSTANDING
Fonts like The Uppercase Baskerville font show below is not
symmetrical, it has two different stroke weight. And the bracket
connecting to the stem of the serif has different sizes.


TYPO_6_SCREEN AND PRINT
- Typography is used in print media, digital media, movies and phone apps.
- Previously typography is thought as living only when it is on paper. Once edited typeset and printed, nothing changes after that.
- Today however, typography exists on multitude of screens. today, with most information available on screens, typesetting happens in the browser. The experimentation level of typography in app or web design is rather restricted which requires a lot of coding.
- Print type was established long before screen type. It is the designer's job to ensure that the text is smooth, flowing and makes reading pleasurable. Type print is versatile, easy to digest classic typefaces.
- These typefaces have neutrality and versatility. (Carson, Garamond, Bakerville)


- Type face intended for usage on the web are optimized and other modified to enhance readability and performance on screen. We can simply optimize it by including taller height or wider letter forms. We can also reduce ascenders and descenders.
- Most screens have good resolution, however there are still some typefaces that is for screens. (Verdana, Georgis)
- Typefaces for smaller sizes, it is important to have open spacing. It seems to improve character recognition and overall readability. in a non print environment. This is true for web, e-books, e-readers and mobile devices.
- A hyperlink is a word phrase or image that you can click on to jump to a new document. Text hyperlink are normally blue and underlined by default.
- When the cursor is moved over the hyperlink, the arrow should change to a small hand pointing at teh link. Hashtags is also a form of hyperlink.
- As for font size for screen, 16 pixel text on a screen is about the size as text printed. It is accounting for reading distance. today the front size could be bigger, the norm to 16 pixels is 10 points, but we an go 12 points or even 20 points.
- This is also pixel differential on different devices. For example, 100 pixels on a laptop is different from the same pixels on a 60" HDTV

- Static typography has minimal character, however there is wide range of typography with a wide range of purposes. The level of impression and impact is closely related to the emotional connection with the viewers.
- Motion typography is deemed more dynamic duet to the motion. However, it all depends on the designer n how he uses the platform and the technology.
- Motion typography is temporal media offer typographers the ability to dramatize type for letter forms to become fluid and kinetic.
- Motion typography is often overlain onto music videos and advertisements following teh rhythm of teh soundtrack.
INSTRUCTIONS
TUTORIALS
VIDEO 1: TYPO_EX_TYPEEXPRESSIONWORDS
VIDEO 2: TYPO_EX TYPEEXPRESSIONWORDS II
VIDEO 2: TYPO_EX TYPEEXPRESSIONWORDS II
VIDEO 3: TYPO_EX TYPE EXPRESSION ANIMATION - BASIC
VIDEO 4: TYPO_EX TEXT FORMATTING 1:4
VIDEO 5: TYPO_EX TEXT FORMATTING 2:4
VIDEO 6: TYPO_EX TEXT FORMATTING 3:4
VIDEO 7: TYPO_EX TEXT FORMATTING 4:4
TASK 1 / EXERCISE 1: TYPE EXPESSION
Why I Choose this design:
- Fire
- Crush
- Water
- Sick
SKETCHING
Mr. Vinod, mention we sketch out at least 3 ideas of each word. I always thought it was going to be easy, but it turns out that I am wrong, we're told not to use so many graphical elements. Words such as Fire and Sick are difficult because they need to have a certain number of graphical elements for the expression to make sense.

I also sketched out an alternative version the word "Water".
that is more intricate, but it didn't turn out as well
as I hoped.

DIGITALIZATION

DRAFT 1


NEW SKETCHES

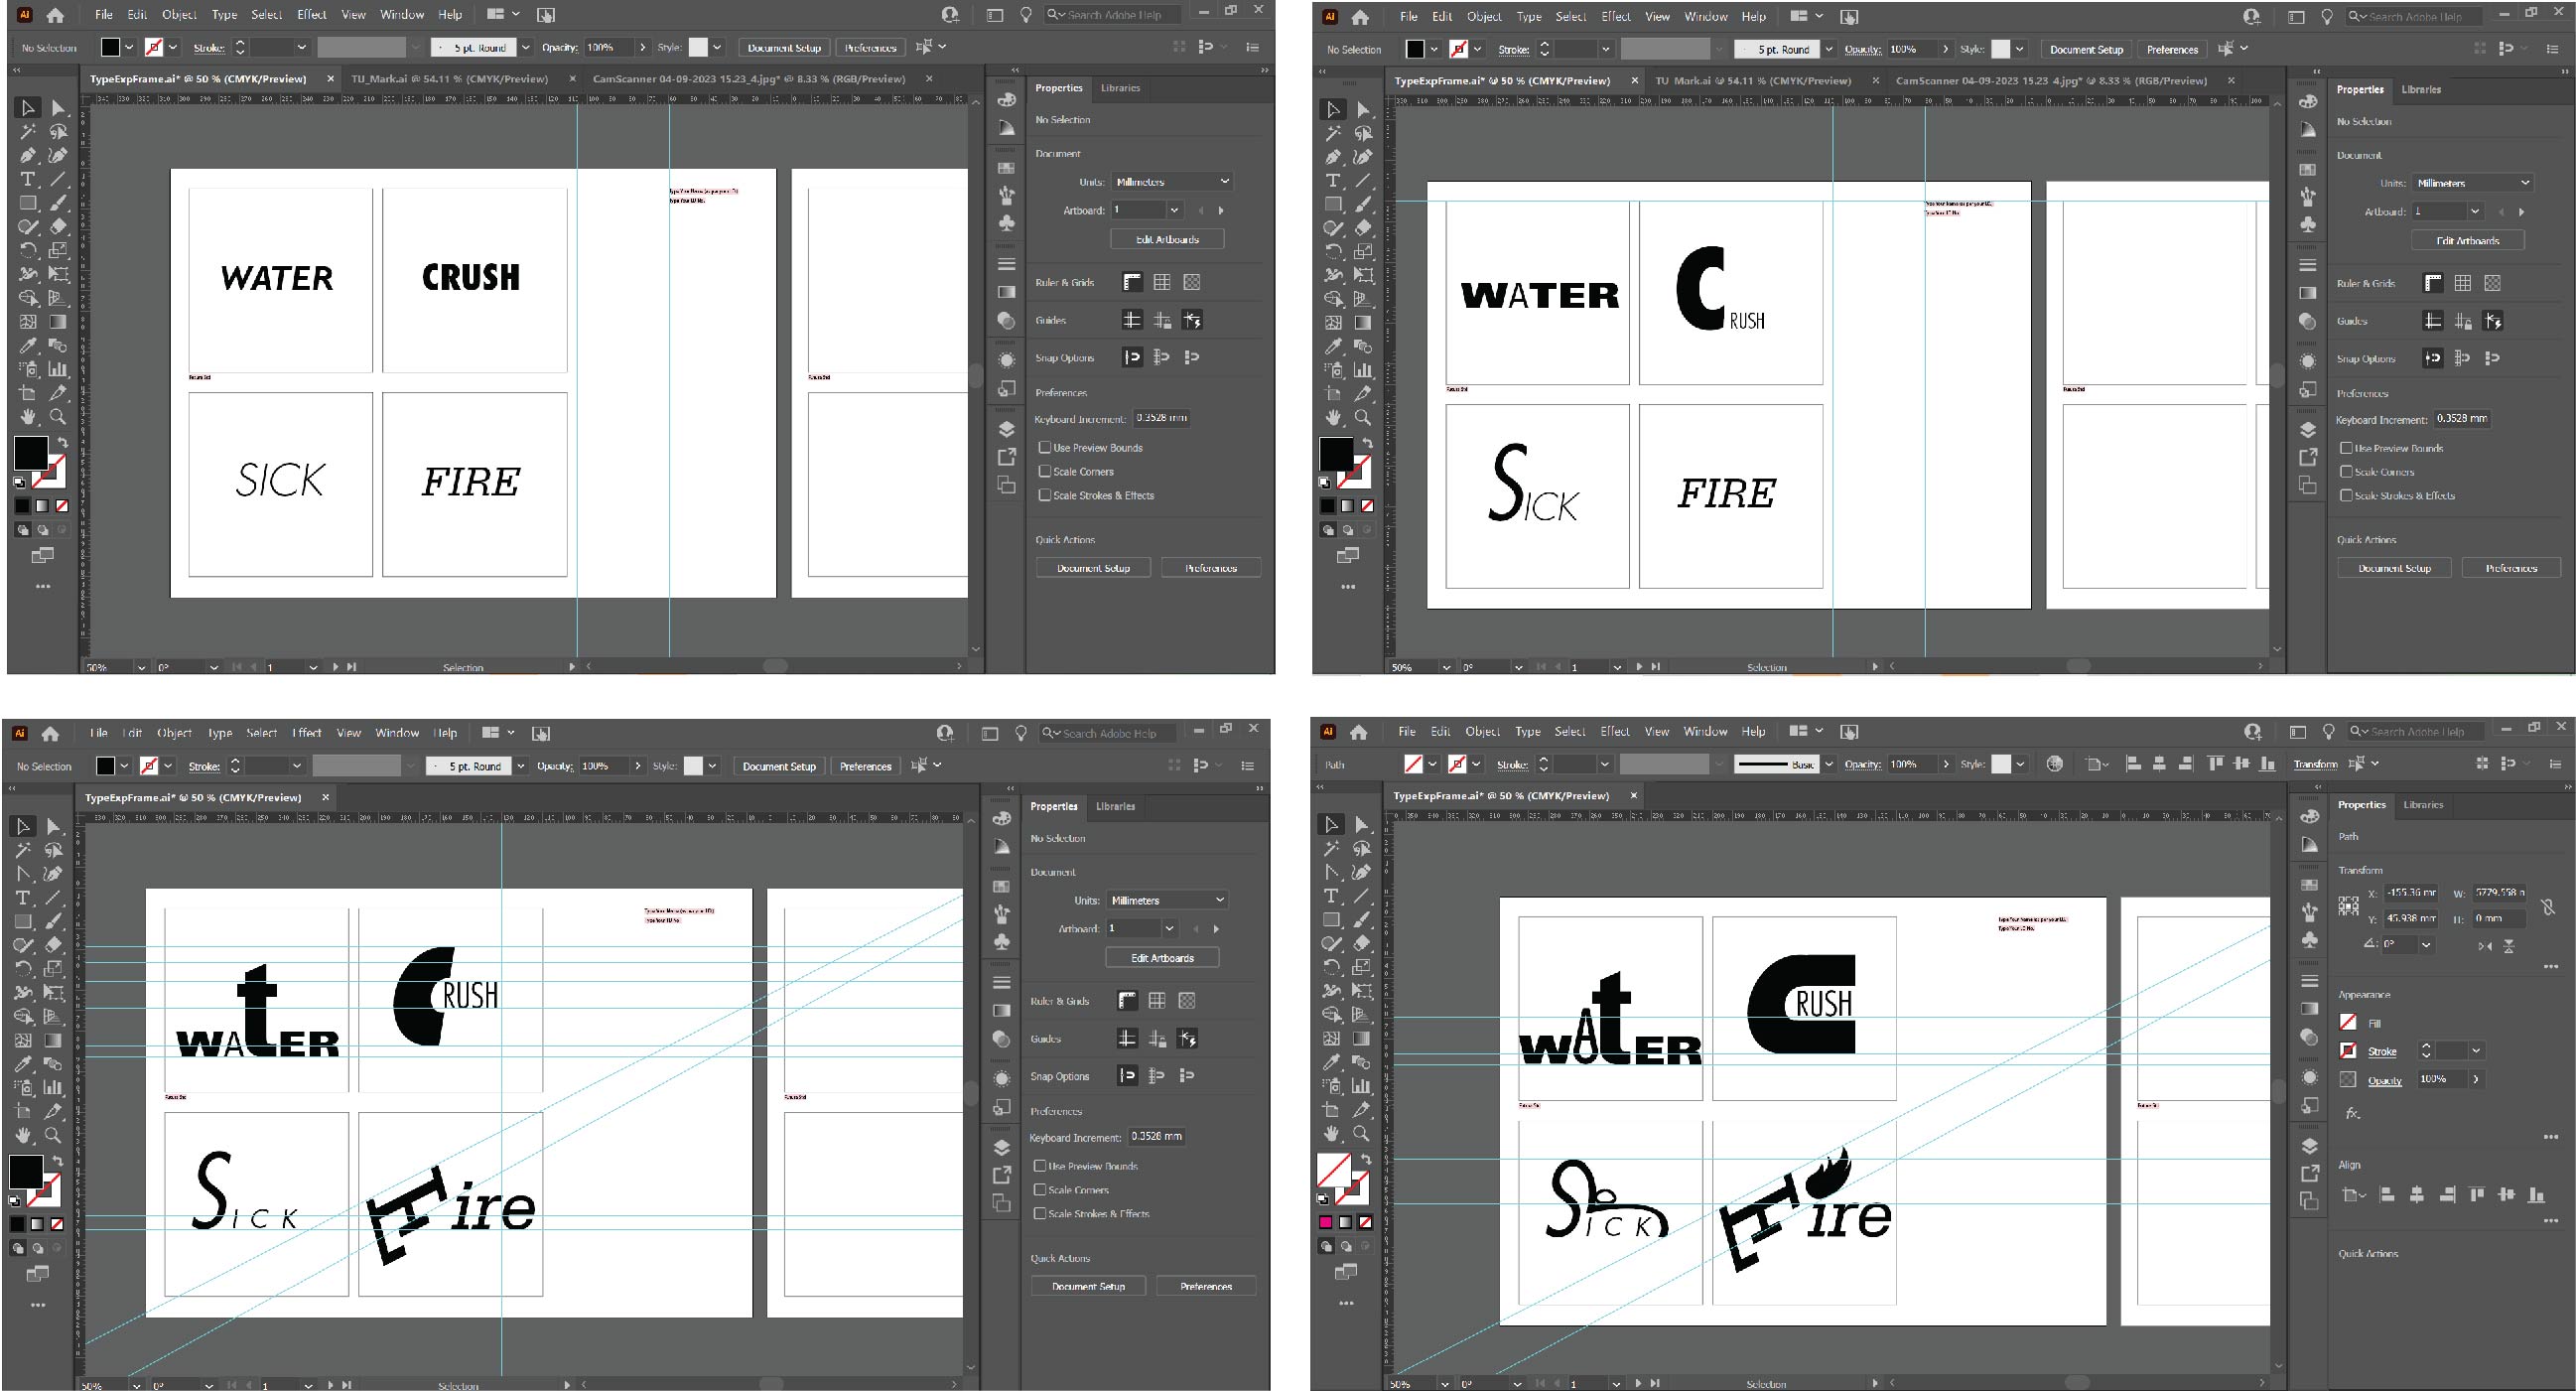
EXPERIMENTATION


In Sick, I came up with 3 different concepts. The concept
shown on the top left box, the letter I was supposed to be a
low battery symbol to express that people tend to be drained
off energy when they are sick. The concept shown on the top
middle and top right, the letter S is supposed to suck on the
letter I which acts as a thermometer. But the expression was
not clearly communicated, the last concept shown on the bottom
left, the letter C is used a bed while the letter I sleeps on
it.


FINAL TYPE EXPRESSION

ANIMATION
In my first attempt on creating the animation, I did not know
how to make the animation look realistic and alive. I started
using a water droplet animation reference which I was able to
find from the internet. I animated the water droplet in Fig
7.5. which is reworked version of the digitized draft, made to
fit closely to the animation reference. I traced the water
droplet frame from the animation reference, but I still had
difficulties in making the water droplet transition to each
frame smoothly.


FINAL ANIMATION
My final animation is a revised version of Crush from my
first draft. I drew the letter "U" first to form a smile and
then added the heart shaped eyes to top up above.


TASK 1 / EXERCISE 2: TEXT FORMATTING
NAME KERNING
In Exercise 2, Mr. Vinod provided a written document titled "I am Helvetica" to the whole a class and it is our job to create a layout for that written document. The Layout will be conducted in a software called InDesign, and we must use the same 10 fonts provided from Exercise 1.
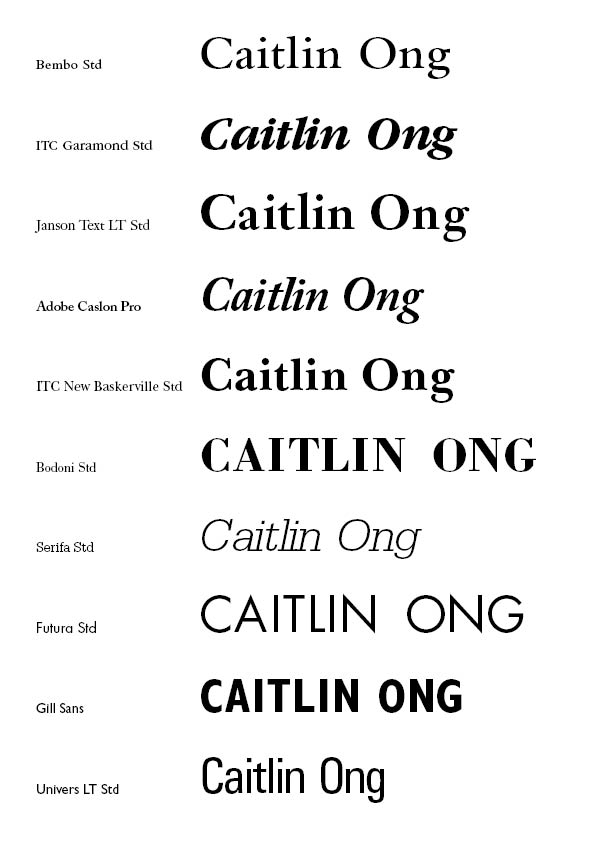
Before we got started, Mr. Vinod mentioned in his Lecture video that we have to, practice kerning the letters by using my name in 10 different types of fonts.

Fig 9.1 Without Kerning (5/5/2023)

PLANNING
In the planning stage, I referenced one of my senior works for ideas on how to plan a layout. Their names are Hewr Khaled Mohamed Walid Bayazid, Lim Rui Ying and Lui Hsiao Hui. From there I used labeled boxes to plan the placement of the contents (Title, Picture and the information)


DRAFTS

Draft 1
Heading
Font: Adobe Caslon Pro (Bold)
Point size: 55pt
Leading: 55pt
Body Text
Font: Adobe Caslon Pro (Regular)
Point size: 11pt
Leading: 11pt
Line Length: Around 50 words
Alignment: Left Alignment
Byline
Font: Adobe Caslon Pro (Semibold Italic)
Point size: 22pt
Caption
Font: Gill Sans Std (Bold Italic)
Point size: 11 pt
Margin & Collums
Margin: 33p0 (Top) 19p0 (Bottom) 3p0 (Left) 3p0 (Right)
Collums: 4
Gutter 1p0
Draft 2
FINAL TEXT FORMATTING
I showed my 2 Drafts to Mr. Vinod; he mentioned that Draft 1 has a weird Ragging while Draft 2 looks condensed. But one of his major concerns is that both of them has small paragraph spacing. I combined the ideas and element of the two drafts. Recalling and relooking into one of Mr. Vinod's lecture videos, I had to relook into the orphans and widows, I then made some adjustments to the paragraph. I followed Mr. Vinod's advice and tips I made the paragraph spacing bigger.


Final Layout
Heading
Font: ITC Garamond Std (Ultra
Condense)
Point size: 110pt & 48
pt
Leading: 72pt
Body Text
Font: ITC Garamond Std
(Book)
Point size: 10 pt
Leading: 9 pt
Line Length: Around 50 words
Alignment: Left
Alignment
Byline
Font: ITC Garamond Std (Ultra
Condense)
Point size: 36 pt
Caption
Font: ITC Garamond Std
(Book Italic)
Point size: 11 pt
Margin & Collums
Margin: 3p0
(Top) 3p0 (Bottom) 3p0 (Left) 3p0 (Right)
Collums:
4
Gutter 1p0
FIXED VERSION


Final Layout
Heading
Font: ITC Garamond Std
(Ultra Condense)
Point size: 110pt
& 48 pt
Leading: 72pt
Body Text
Font: ITC Garamond
Std (Book)
Point size: 10 pt
Leading: 9 pt
Line Length: Around 50 words
Alignment: Left
Alignment
Byline
Font: ITC Garamond Std
(Ultra Condense)
Point size: 36 pt
Caption
Font: ITC
Garamond Std (Book Italic)
Point size: 11 pt
Margin & Collums
Margin: 3p0 (Top) 3p0 (Bottom) 3p0 (Left)
3p0 (Right)
Collums: 4
Gutter 1p0
FEEDBACK
WEEK 2
General Feedback:
- Doing a digital sketch in not consider a sketch.
- As long as fixed shape of the original font is maintained when it comes to distortion it is acceptable (logical distortion)
- Using punctuation is acceptable.
- Initial of the word is acceptable.
- For the "Water" Sketch #5 Don't make the letter T pipe too large compared to the other (T is too graphic)
- The heart in Crush Sketch #4 is not applicable can put a 3 as a replacement.
- Fire sketch is too generalized.
- In Sick Sketch #2 the cross shape can be a apply by aligning multiple words horizontally and vertically
- Mr. Vinod gave me some advice on how to do the cross shape for the word "Sick" by aliening multiple words horizontally and vertically.
- For the alternative sketch he told me to scale down the size and prefer that I use the original
WEEK 3
General Feedback:
- Fully utile the space within the box,
- Avoid join letter using line, make words bigger,
- Look at the over effect of the composition.
- Water word is too graphic, Fire word use the wrong font,
- Crush is executed well and too distorted,
- Sick word too much graphic element too much distortion,
- Keep to the letter A in the Water word don't change it as a water droplet.
- Pause at the end of the animation for a few seconds,
- Make the animation emphasis the literal expression.
- It's Ok
- There is a shift on the letter U on the word Crush.
- The point size of the words needs to be bigger.
- Don't put too much space in-between Paragraph.
- Space around the image and the text needs to be 5mm - 7mm.
- Too much capitization of the text break the reading flow, it is ideal to reduce the size of the font.
- Words in a sentence is a maximum of 65 words.
- -Use the appropriate image
- Make the hynaphation have the appropriate placement.
- Make use of the space in the Layout
- Don't use Italic for body text, use it for emphasis.
Specific Feedback:
Draft 1- Layout is fine.
- Leading is too tight, should be 12 or 13 pt.
- Raging is strange.
- Paragraph spacing is not right. it should be 2.5 to 4.0 pt larger.
- Leading should be 12 or 13.
- Body text is heavy because there is not enough leading.
- Point size is OK.
- Use regular for a body text typeface don't use condense.
REFLECTION
EXPERIENCE
OBSERVATION
When Mr. Vinod review my friend’s work in practice class, I find it more helpful as it gives me more inspiration whenever I feel lost coming up on ways on how to evolve my projects. I had difficulty on explaining my progress about a specific project and to know which pictures are relevant to show my progress.
FINDINGS
I find that when I meet with Mr. Vinod, and he gives feedback on my work I would then get a better perspective and inspired. For example, I noticed that my Word Expression was improving as Mr. Vinod noticed that a one of my words is too distorted or it is not executed very well. From then onwards I decided to explore more by experimenting on different types of fonts and finding more way to make the expression more clearly communicating the meaning and with minimum distortion.
FURTHER READING

The syntax of a design is provided by the many components of graphic design. Grid are important to achieve good consistency in the design.
The pragmatic of it all is design concept must be understood, and the message clear. It is important to achieve good consistency in the design.

It evolves from the invention of writing till the invention of movable type in the fifteenth century. It also reveals about the Industrial Revolution where technological innovation thus and outpouring of new typographic forms. In the twentieth century the type is shaped by aesthetic concerns of modernism.
Legibility of any typographic is achieved by controlling the qualities and attributes to make the type readable. Colors are import of Justified vs unjustified typography, flush left, ragged right could promote better legibility. It guides the eye smoothly down the page. Indentions and paragraphing of better separation of ideas.
The book also talks about Grids used as framework to organize information within a space. It gives designers to make information clear and optimally accessible. This results in clearer communication.
Typographic syntax starts with understanding the letter, the word, the line, columns and margins, typographic space, visual hierarchy and visual relationships.
Comments
Post a Comment