11.05.2023 (Week 6) Caitlin Ong Lynn Dee / 0343801 / Bachelor of Design (Honour) in Creative
Media Digital Photography and Imaging Week 6 Blog
LECTURE
Digital Photography
Originally the Digital Photography Lecture is supposed to be in Week 5 but was changed due to Week 5 being a public holiday. we learn about the exposure setting of a camera, the inner workings of a camera, the Len perspective, and comparison between a DSLR and a smartphone.
Exposure Setting
Exposure:
In photography, exposure is the amount of light which reaches your camera sensor or film.
Fig 1.1 Exposure Comparision
The main parts of the camera:
Camera body: Shutter, Image sensor, LCD screen
Camera lens: Aperture/ Iris
The camera body is a light proof box.
Fig 1.2 Camera Diagram
Iris:
Iris/Aperture is controlling the flow of light entering the lens.
Iris/Aperture is measured by f-stop, indicated by sequence of f-number: f/1, f/1.4, f/2 , f/ 2.8, f/ 4, f/ 5.6, f/ 8, f/ 11, f/ 16, f/22 , f/32..
The lower the f-number, the larger the lens opening.
Fig 1.3 Camera Iris
Fig 1.4 F-Numbers
Shutter:
The shutter is a small plastic sheet that opens and closes to allow light onto the film or prevent light from reaching the film.
Shutter Speed: Shutter speed is measured in seconds: 1/1000 s,1/500 s,1/250 s,1/125 s,1/60 s,1/30 s,1/15 s,1/8 s,1/4 s,1/2 s,1 s, 2 s, 3 s
Fig 1.5 Camera Shutter
Fig 1.6 Shutter Speed Comparision
ISO:
Originally referred to the sensitivity of film—it's "light gathering" ability. For digital photography, ISO refers to the sensitivity—the signal gain—of the camera's sensor.
The common ISO camera settings are: 100, 200, 400, 640, 800, 1600, 3200, 6400….
The lower the number of ISO the less sensitive your camera is to light and the finer the grain.
Fig 1.7 ISO: Brightness Comparision
Fig 1.8 ISO: Grain Comparision
Lens Perspective The are wide angle lens, standard lens and tele lens. Appropriate lens provided desire framing; lens choice affects angle of view. Different lenses are designed for different for different purposes. Lenses can be categorized by FOCAL LENGTH.
FOCAL LENGTH: The shorter the focal length, the wider the angle of view and vice-versa. FOCAL LENGTH: Focal length is the measurement (in millimeters)
TUTORIAL
Video 1: Photography basic in 10 minutes by David Manning
Video 2: creative Product Photography at Home - Beginner to Pro! by Chris Pieta
Video 3: Shooting a Bottle with ONE Continuous Light and a Smartphone by figandlight
PRACTICAL
Instruction
Part 1:
Part 2:
Recoloring Black & White
Part 1
This exercise is where we color a black & white photo. For Part 1 Mr.
Yusoff provided us a black & white picture in Google drive, and we
have to follow a step-by-step video on how to do it.
Use the brush tool to color the face.
Use the blending mode to make a color blend with the textures
seamlessly.
This method is repeated from all body parts.
Finalize the colors by adjusting the saturation.
Fig 2.l Original Photo (13/05/2023)
Fig 2.2 Step 1: Color the face using the Brush Tool (13/05/2023)
Fig 2.3 Step 2: Use Blending Mode, Overlay (13/05/2023)
Fig 2.4 Step 3: Repeat the process for all body parts (13/05/2023)
Fig 2.5 Step 3: Repeat the process for all body parts (13/05/2023)
Fig 2.6 Step 4: Fill the entire image with the any color (13/05/2023)
Fig 2.7 Step 5: Mask the background (13/05/2023)
Fig 2.8 Step 6: Masking Result (13/05/2023)
Fig 2.9 Step 7: Decrease the Opacity of the background (13/05/2023)
Fig 2.10 Step 8: Adjust the Saturation to finalize the colors (13?05/2023)
Fig 2.11 Initial Color (13/05/2023)
Fig 2.12 Final Color (13/05/2023)
Part 2
In part 2, we have to sample the skin color and the hair color from
other photos, to color the black and white photo. The black and with
photo along with the skin and hair reference photos are provided in
google drive. We have watched a step-by-step video from Mr.
Yusoff.
For the skin color we have to cut out the part of the
reference's face and copy it to the black and white
photo.
The sample size of the Eyedropper Tool needs
to be 5 by 5 Average. Use the Eyedropper tool to
pick up Highlight, Midtone and Shadow and use
the Brush Tool to paint it over to create a set
of color scheme.The process is respected for the
hair reference.
Use the Quick Selection Tool to roughly select
the hair and refine it by pressing the layer mask and then press
the Select & Mask button.
Select the Overlay option in Viewing Mode.
Use the Refine Edge Brush Tool to brush
over the edges.
After refining it select the Output to: Layer Mask.
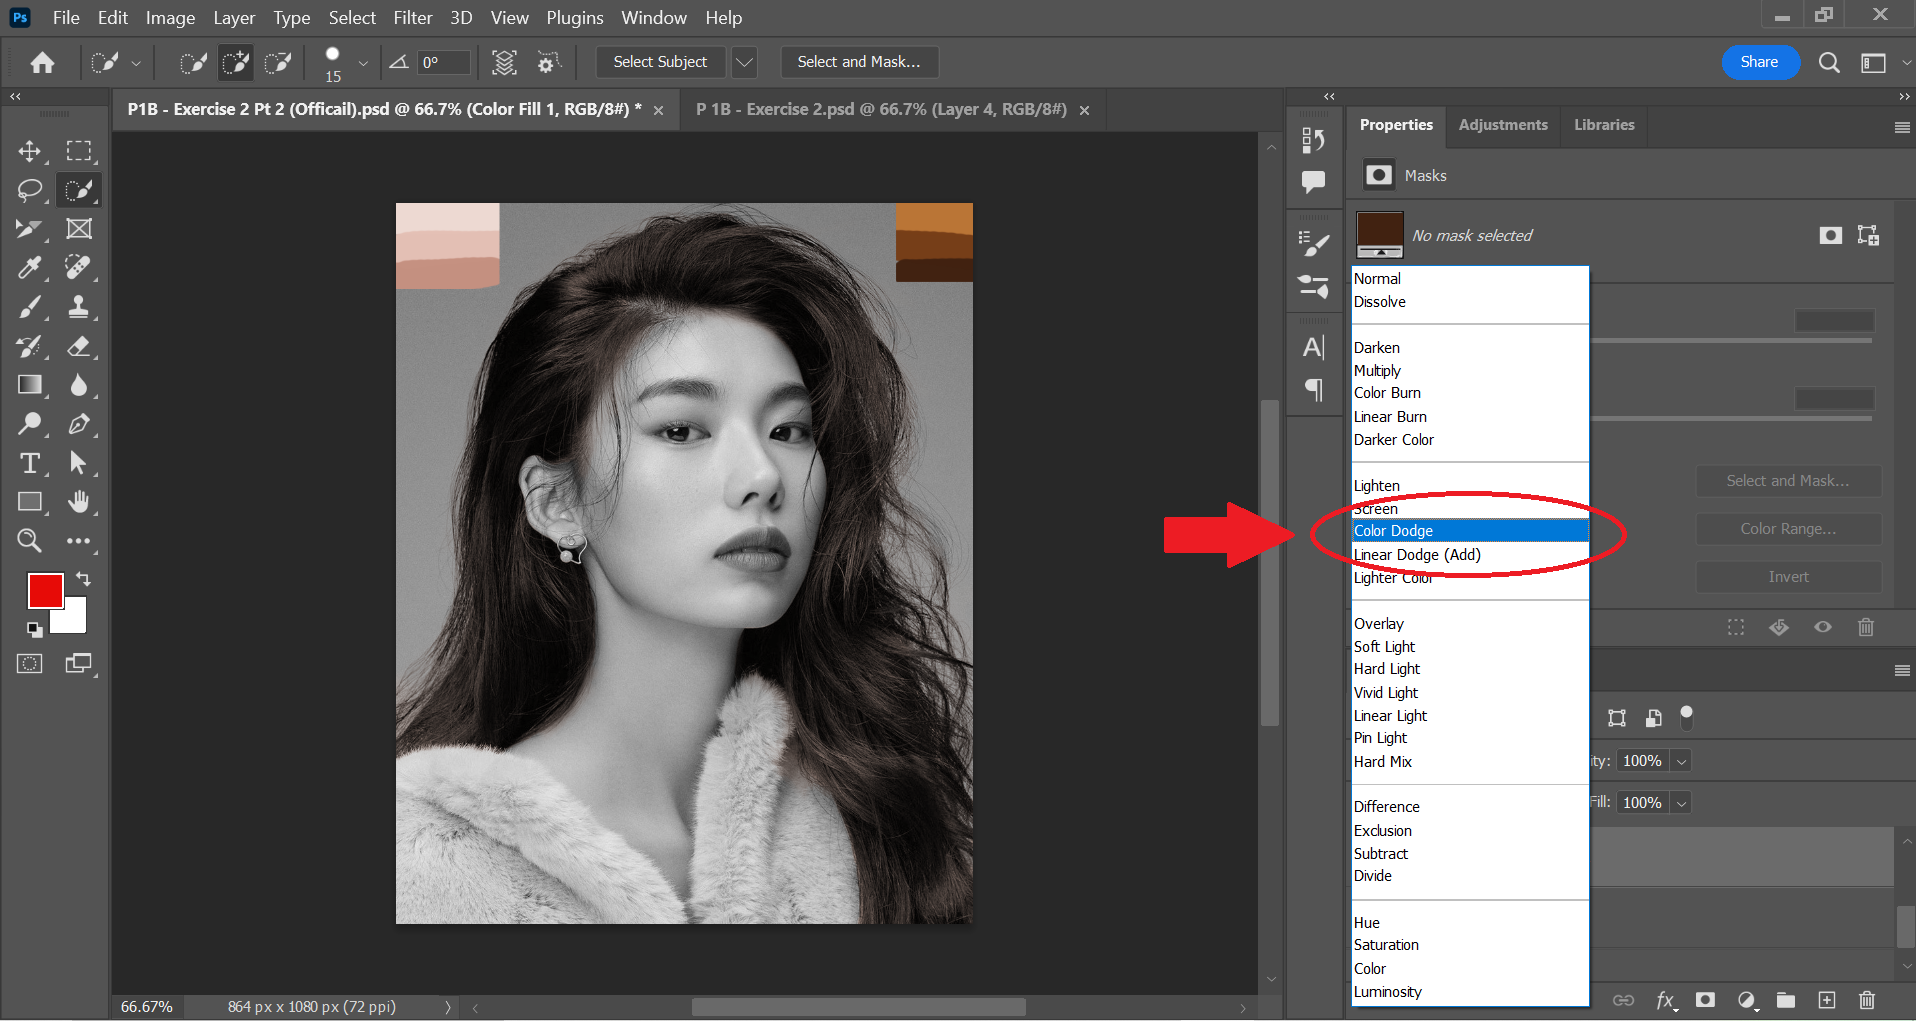
Create a new Solid Color layer and use the Color Picker to choose the hair color.
Drag and drop the hair layer mask to Solid Color layer to replace the layer mask,
Select Blending Mode to pick a preferable blending option.
The Process is repeated for all body parts.
For the Background add Layer mask to new Solid Color layer and then choose a Blending Mode option
Fig 3.1 Original Photo with Skin and Hair Reference (14/05/2023)
In my first attempt the process I go through was not
instructed in the video, and the skin lack any shadow, so
I recolor it and I follow the same process as the video.
Fig 3.2 First Attempt Color (14/05/2023)
Fig 3.3 Step 1: Sample color from the Skin Reference (14/05/2023)
Fig 3.4 Step 2: Sample color from the Hair Reference (14/05/2023)
Fig 3.5 Step 3: Use Quick Selection Tool to select the hair. (14/05/2023)
Fig 3.6 Step 4: Under "Select & Mask" mode, Refined the
hair. (14/05/2023)
Fig 3.7 Step 5: Create Solid Color Layer and put Layer mask. (14/05/2023)
Fig 3.8 Step 6: Use Blending Mode(14/05/2023)
Fig 3.9 Step 7: Repeat the process for all body parts.(14/05/2023)
Fig 3.10 Step 8: Mask the background (14/05/2023)
Fig 3.11 Step 9: Refine Mask (14/05/2023)
Fig 3.12 Step 10: Create Solid Color Layer and put Layer mask (14/05/2023)
Fig 3.13 Final Color (14/05/2023)
Part 3
In Part 3 We have to repeat the process from part 2 but this time
have to find skin and hair reference from the internet. The Black
and White photo has been provided.
Fig 4.1 Original Photo with Skin and Hair Reference (14/05/2023)


.png)


Comments
Post a Comment